Hiya!
Check out this week's lovely ColourQ combo...
I was in a hurry with this one so I raided my scraps stash together with the lovely Gold Soiree dsp and came up with this...
I used the Sweet Sunday Sketch for my layout...
Here's the recipe:
Stamps: Mixed Bunch, Yippee Skippee
Ink: Calypso Coral
Paper: Gold Soiree, Island Indigo, Pistachio Pudding, Whisper White
Accessories: rhinestones, Dazzling Details
Tools: Flower Frenzy die, Beautiful Wings embosslit, Blossom punch
Make sure you check out the wonderful creations from the rest of the Royal Court this week!
Thanks for stopping by...
x Amy x
Showing posts with label Yippee Skippee. Show all posts
Tuesday, 2 December 2014
Monday, 28 July 2014
Anniversary Love Letters...
Hello!
So today is my hubby & I's 13th wedding anniversary... Of course, I had to make him a card (one that would pass his high masculine standards!!) so as I was looking for ideas I took a look through one of the new Project Life collections of cards - Happiness Is (which I was fortunate enough to win at a recent Stampin' Up training event - thanks Jane & Hayley!!). I found a particular 4x4" card, and then when I saw the current Cutting Edge challenge I had a little idea... See I've been wanting to play with the new Little Letters thinlit dies and when I combined them with the Project Life card, I ended up with this...
I simply placed the letter framelits over the card, passed through the big shot and voila! I added a die-cut heart in Blackberry Bliss to the centre as well as embossed greeting, die-cut with the Bitty Banner framelits, added a few candy dots and attached it to the Basic Grey panel (which I stamped with Gorgeous Grunge).
Of course, I had the letters left over after die-cutting, so I added them to the inside...
He liked that bit... lol! I inked up the top and bottom separately of the sentiment from Yippee Skippee with my Blackberry Bliss marker then stamped them with enough room in between to fit the letters.
This is The Cutting Edge inspiration card...
Now I know mine doesn't look anything like this lovely creation, but it genuinely inspired me with those cut-out love letters, and I also took inspiration from the little dot clusters (hence my use of Gorgeous Grunge)...
Here's the recipe:
Stamps: Gorgeous Grunge, Teeny Tiny Wishes, Yippee Skppee
Ink: Smoky Slate, Sahara Sand, versamark
Paper: Project Life Happiness Is collection, Basic Grey, Blackberry Bliss, Whisper White
Accessories: Neutrals Candy dots, white EP
Tools: Little Letters thinlits, Fashionable Hearts embosslit, Bitty Banners framelits
Thanks for stopping by!
x Amy x
So today is my hubby & I's 13th wedding anniversary... Of course, I had to make him a card (one that would pass his high masculine standards!!) so as I was looking for ideas I took a look through one of the new Project Life collections of cards - Happiness Is (which I was fortunate enough to win at a recent Stampin' Up training event - thanks Jane & Hayley!!). I found a particular 4x4" card, and then when I saw the current Cutting Edge challenge I had a little idea... See I've been wanting to play with the new Little Letters thinlit dies and when I combined them with the Project Life card, I ended up with this...
I simply placed the letter framelits over the card, passed through the big shot and voila! I added a die-cut heart in Blackberry Bliss to the centre as well as embossed greeting, die-cut with the Bitty Banner framelits, added a few candy dots and attached it to the Basic Grey panel (which I stamped with Gorgeous Grunge).
Of course, I had the letters left over after die-cutting, so I added them to the inside...
He liked that bit... lol! I inked up the top and bottom separately of the sentiment from Yippee Skippee with my Blackberry Bliss marker then stamped them with enough room in between to fit the letters.
This is The Cutting Edge inspiration card...
Now I know mine doesn't look anything like this lovely creation, but it genuinely inspired me with those cut-out love letters, and I also took inspiration from the little dot clusters (hence my use of Gorgeous Grunge)...
Here's the recipe:
Stamps: Gorgeous Grunge, Teeny Tiny Wishes, Yippee Skppee
Ink: Smoky Slate, Sahara Sand, versamark
Paper: Project Life Happiness Is collection, Basic Grey, Blackberry Bliss, Whisper White
Accessories: Neutrals Candy dots, white EP
Tools: Little Letters thinlits, Fashionable Hearts embosslit, Bitty Banners framelits
Thanks for stopping by!
x Amy x
Tuesday, 24 June 2014
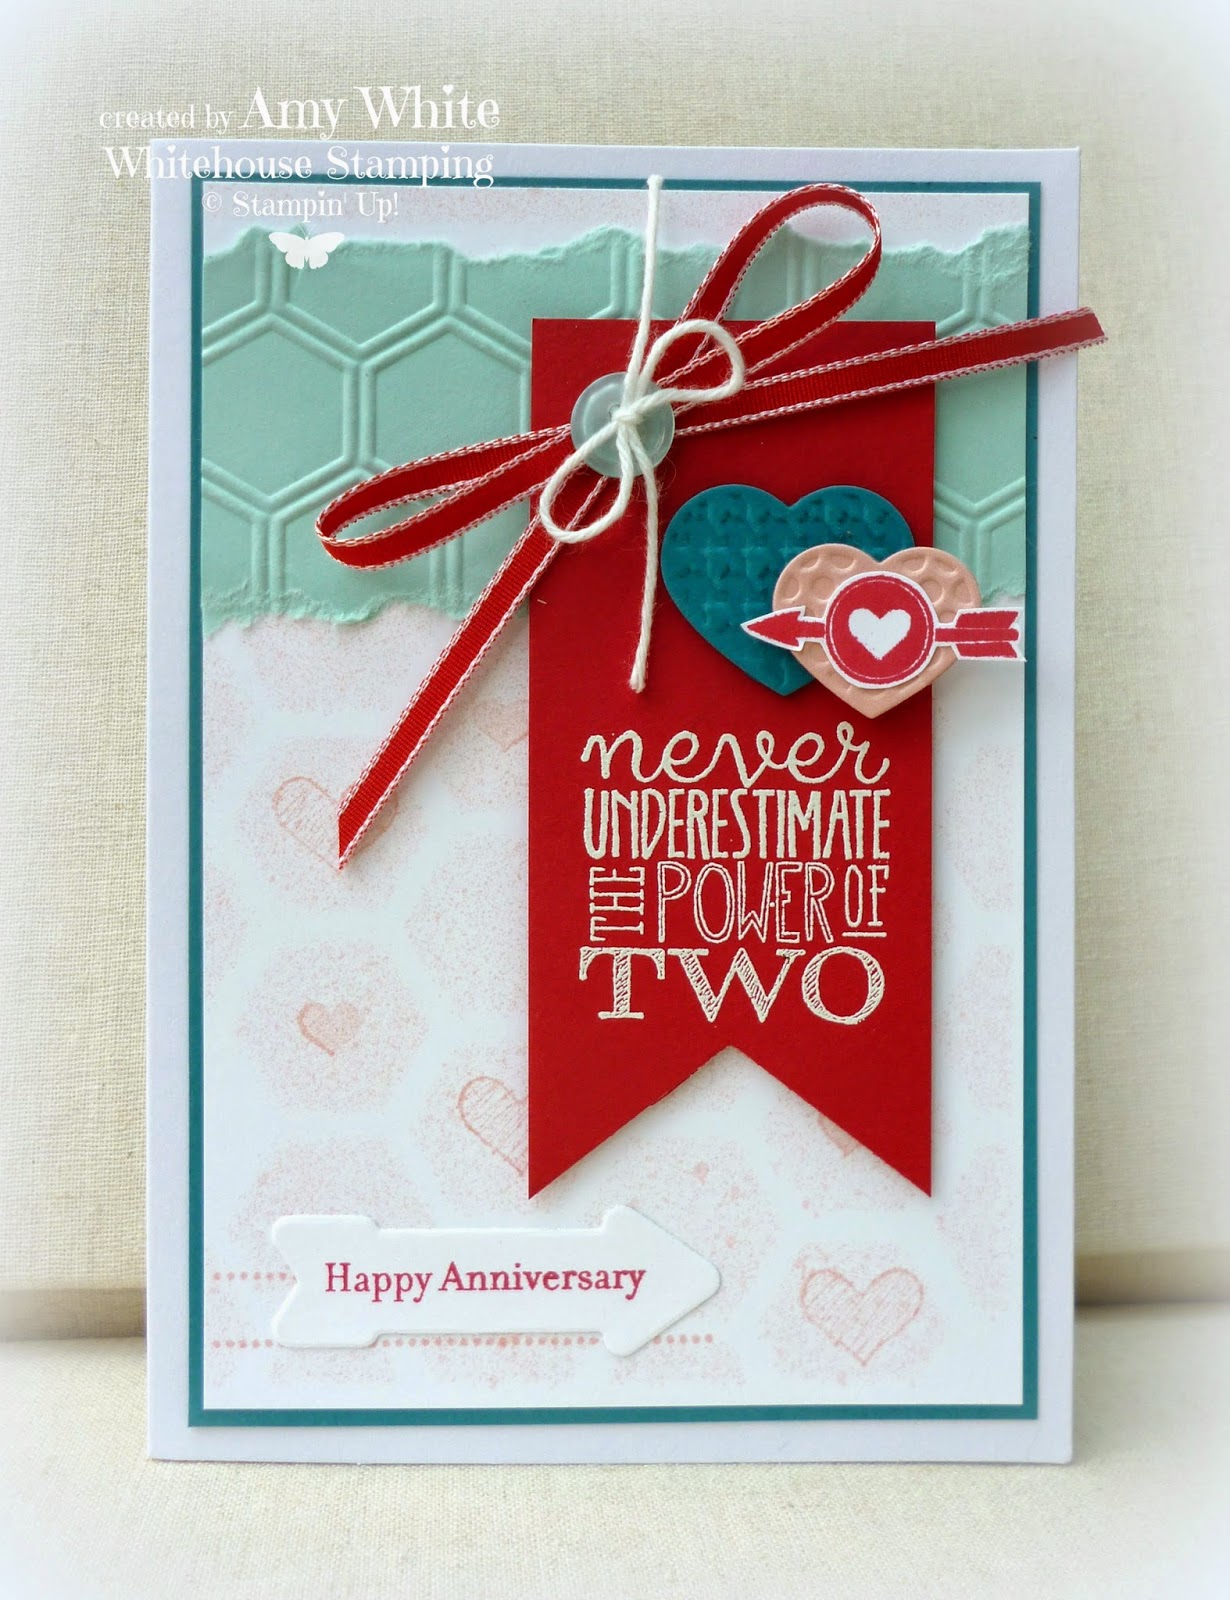
The Power of Two...
Hiya!
It's time for another ColourQ challenge and this week's combo is a pretty one...
I decided to make an anniversary card, creating a subtle background with a couple of new goodies...
The background was created by spritzing some Blushing Bride ink over the Hexagon Hive die, then I stamped some different heart images in the hexagons, from the Project Life Point & Click clear set and from Something to Say. The 'power of two' sentiment was embossed on Real Red card with white EP, the cut into a banner. I added some embossed hearts, a little arrow stamp from Point & Click, and some Real Red ribbon and Pool Party button as a little cluster.
Here's the recipe:
Stamps: Point & Click, Yippee Skippee, Something to Say, Teeny Tiny Sentiments
Ink: Real Red, Blushing Bride, Versamark
Paper: Real Red, Island Indigo, Pool Party, Blushing Bride, Whisper White
Accessories: Real Red 1/8" ribbon, Pool Party button, White embossing powder
Tools: Hexagon Hive thinlit die, On Film framelits (arrow), Fashionable Hearts embosslits, honeycomb embossing folder
I used the sketch from Pals Paper Arts this week...
Make sure you checkout the fabulous designs from the rest of the Royal Court this week - we'd love to see you play along with us!
Thanks for stopping by...
x Amy x
It's time for another ColourQ challenge and this week's combo is a pretty one...
I decided to make an anniversary card, creating a subtle background with a couple of new goodies...
The background was created by spritzing some Blushing Bride ink over the Hexagon Hive die, then I stamped some different heart images in the hexagons, from the Project Life Point & Click clear set and from Something to Say. The 'power of two' sentiment was embossed on Real Red card with white EP, the cut into a banner. I added some embossed hearts, a little arrow stamp from Point & Click, and some Real Red ribbon and Pool Party button as a little cluster.
Here's the recipe:
Stamps: Point & Click, Yippee Skippee, Something to Say, Teeny Tiny Sentiments
Ink: Real Red, Blushing Bride, Versamark
Paper: Real Red, Island Indigo, Pool Party, Blushing Bride, Whisper White
Accessories: Real Red 1/8" ribbon, Pool Party button, White embossing powder
Tools: Hexagon Hive thinlit die, On Film framelits (arrow), Fashionable Hearts embosslits, honeycomb embossing folder
I used the sketch from Pals Paper Arts this week...
Make sure you checkout the fabulous designs from the rest of the Royal Court this week - we'd love to see you play along with us!
Thanks for stopping by...
x Amy x
Tuesday, 20 May 2014
Retro Sparkly Cupcakes
Hiya!
This week's ColourQ challenge is a bright and funky one...
I had LOTS of fun playing with this one - I decided to create some colourful cupcakes...
When I saw the Retro Sketches layout this week I knew I wanted to use it for this challenge - I love the circle shape coming from the side and I immediately thought of using framelits to create the circle frames. The cupcakes are from Another Great Year, stamped on Naturals White with Stazon then watercoloured with ink and an aqua painter. I then cut them out with my paper snips and stamped over the cases with different stamps and the coordinating ink. The final touch was adding some Dazzling Details to the icing!
Here's the recipe:
Stamps: Another Great Year, Yippee Skippee
Ink: Melon Mambo, Old Olive, Tempting Turquoise, Daffodil Delight, Versamark
Paper: Quatrefancy dsp, Tempting Turquoise, Melon Mambo, Naturals White, Whisper White
Accessories: Rhinestones, Dazzling Details, White embossing powder
Tools: Circle Framelits, banner die from Thinlits card collection
Make sure you check out what the rest of the Royal Court have created to inspire you this week!
Thanks for stopping by...
x Amy x
This week's ColourQ challenge is a bright and funky one...
I had LOTS of fun playing with this one - I decided to create some colourful cupcakes...
When I saw the Retro Sketches layout this week I knew I wanted to use it for this challenge - I love the circle shape coming from the side and I immediately thought of using framelits to create the circle frames. The cupcakes are from Another Great Year, stamped on Naturals White with Stazon then watercoloured with ink and an aqua painter. I then cut them out with my paper snips and stamped over the cases with different stamps and the coordinating ink. The final touch was adding some Dazzling Details to the icing!
Here's the recipe:
Stamps: Another Great Year, Yippee Skippee
Ink: Melon Mambo, Old Olive, Tempting Turquoise, Daffodil Delight, Versamark
Paper: Quatrefancy dsp, Tempting Turquoise, Melon Mambo, Naturals White, Whisper White
Accessories: Rhinestones, Dazzling Details, White embossing powder
Tools: Circle Framelits, banner die from Thinlits card collection
Make sure you check out what the rest of the Royal Court have created to inspire you this week!
Thanks for stopping by...
x Amy x
Tuesday, 4 March 2014
Film strip thanks...
Hello!
I'm popping in with my ColourQ card this week, and this is the colour palette we are playing with...
I thought the combination of greens, grey and black would make a great masculine card, so that's what I ended up with...
Pretty CAS for me eh?! I'm really loving playing around with the On Film framelits at the moment (as you can see from my mini album pages I've been sharing) and I thought I could use one on this card, pairing it with a sentiment from Yippee Skippee. I added a bit of Gorgeous Grunge (my go-to accompaniment set for guys' cards) as well as a leaf from Wonderfall, rock 'n' rolled with Gumball Green and Garden Green.
Here's the recipe:
Stamps: Wonderfall, Gorgeous Grunge, Yippee Skippee
Ink: Basic Grey, Garden Green, Gumball Green
Paper: Basic Grey, Basic Black, Whisper White
Accessories: Neutrals candy dots
Tools: On Film Framelits, Autumn Accents bigz die, Envelope Punch board
Hop over to the ColourQ and check out the inspiration from the rest of the design team this week - I'm sure their creations will give you lots of creative ideas!
Thanks for stopping by...
x Amy x
I'm popping in with my ColourQ card this week, and this is the colour palette we are playing with...
I thought the combination of greens, grey and black would make a great masculine card, so that's what I ended up with...
Pretty CAS for me eh?! I'm really loving playing around with the On Film framelits at the moment (as you can see from my mini album pages I've been sharing) and I thought I could use one on this card, pairing it with a sentiment from Yippee Skippee. I added a bit of Gorgeous Grunge (my go-to accompaniment set for guys' cards) as well as a leaf from Wonderfall, rock 'n' rolled with Gumball Green and Garden Green.
Here's the recipe:
Stamps: Wonderfall, Gorgeous Grunge, Yippee Skippee
Ink: Basic Grey, Garden Green, Gumball Green
Paper: Basic Grey, Basic Black, Whisper White
Accessories: Neutrals candy dots
Tools: On Film Framelits, Autumn Accents bigz die, Envelope Punch board
Hop over to the ColourQ and check out the inspiration from the rest of the design team this week - I'm sure their creations will give you lots of creative ideas!
Thanks for stopping by...
x Amy x
Sunday, 5 January 2014
The Power of Two...
Hiya!
I have a little something to share today that I made using the colour challenge from Create with Connie & Mary this week. I discovered today that it is also perfect for the Paper Players challenge this week to use the chalkboard technique!
I wanted to use a new stamp set to my collection - Yippee Skippee - so I chose my favourite sentiment from the set and paired it with the Flowerfull stamp from the Whole lot of Love promotion, and came up with this...
I embossed one heart with white EP on Strawberry Slush card, and the other with black EP on Bermuda Bay card then both were die-cut with the coordinating hearts framelit. The chalkboard was created by sponging some white ink onto the black card, then stamping the flourishes with white ink on the corners. The sentiment was stamped with Versamark and embossed in white. The little banners are a sneak peek of a set coming in the Spring/Summer catty at the end of this month (we got given this set at Convention as an all attendee giveaway!).
Here's the recipe:
Stamps: Flowerfull, Yippee Skippee, Flowering Flourishes, Language of Love
Paper: Basic Black, Bermuda Bay, Strawberry Slush
Ink: Versamark, Whisper White
Accessories: Black EP, White EP
Tools: Hearts framelits, Envelope punch board (for rounding corners)
Thanks for stopping by!
x Amy x
I have a little something to share today that I made using the colour challenge from Create with Connie & Mary this week. I discovered today that it is also perfect for the Paper Players challenge this week to use the chalkboard technique!
I wanted to use a new stamp set to my collection - Yippee Skippee - so I chose my favourite sentiment from the set and paired it with the Flowerfull stamp from the Whole lot of Love promotion, and came up with this...
I embossed one heart with white EP on Strawberry Slush card, and the other with black EP on Bermuda Bay card then both were die-cut with the coordinating hearts framelit. The chalkboard was created by sponging some white ink onto the black card, then stamping the flourishes with white ink on the corners. The sentiment was stamped with Versamark and embossed in white. The little banners are a sneak peek of a set coming in the Spring/Summer catty at the end of this month (we got given this set at Convention as an all attendee giveaway!).
Here's the recipe:
Stamps: Flowerfull, Yippee Skippee, Flowering Flourishes, Language of Love
Paper: Basic Black, Bermuda Bay, Strawberry Slush
Ink: Versamark, Whisper White
Accessories: Black EP, White EP
Tools: Hearts framelits, Envelope punch board (for rounding corners)
Thanks for stopping by!
x Amy x
Subscribe to:
Posts (Atom)