Friday 31 August 2012

Baby pleating...

Hello!

It's my turn to host the Friday Mashup challenge this week and I decided to combine a theme (baby) and a technique (pleating)...

So here is the "Mashup" Challenge:
  1. Make a project with "Pleating".
  2. Or Make a "Baby Theme" project .
  3. Or "Mash it Up" and create a project with "Pleating and a Baby Theme".

I even created a tutorial for paper pleating, which you can find here.

And here's my creation for this challenge:


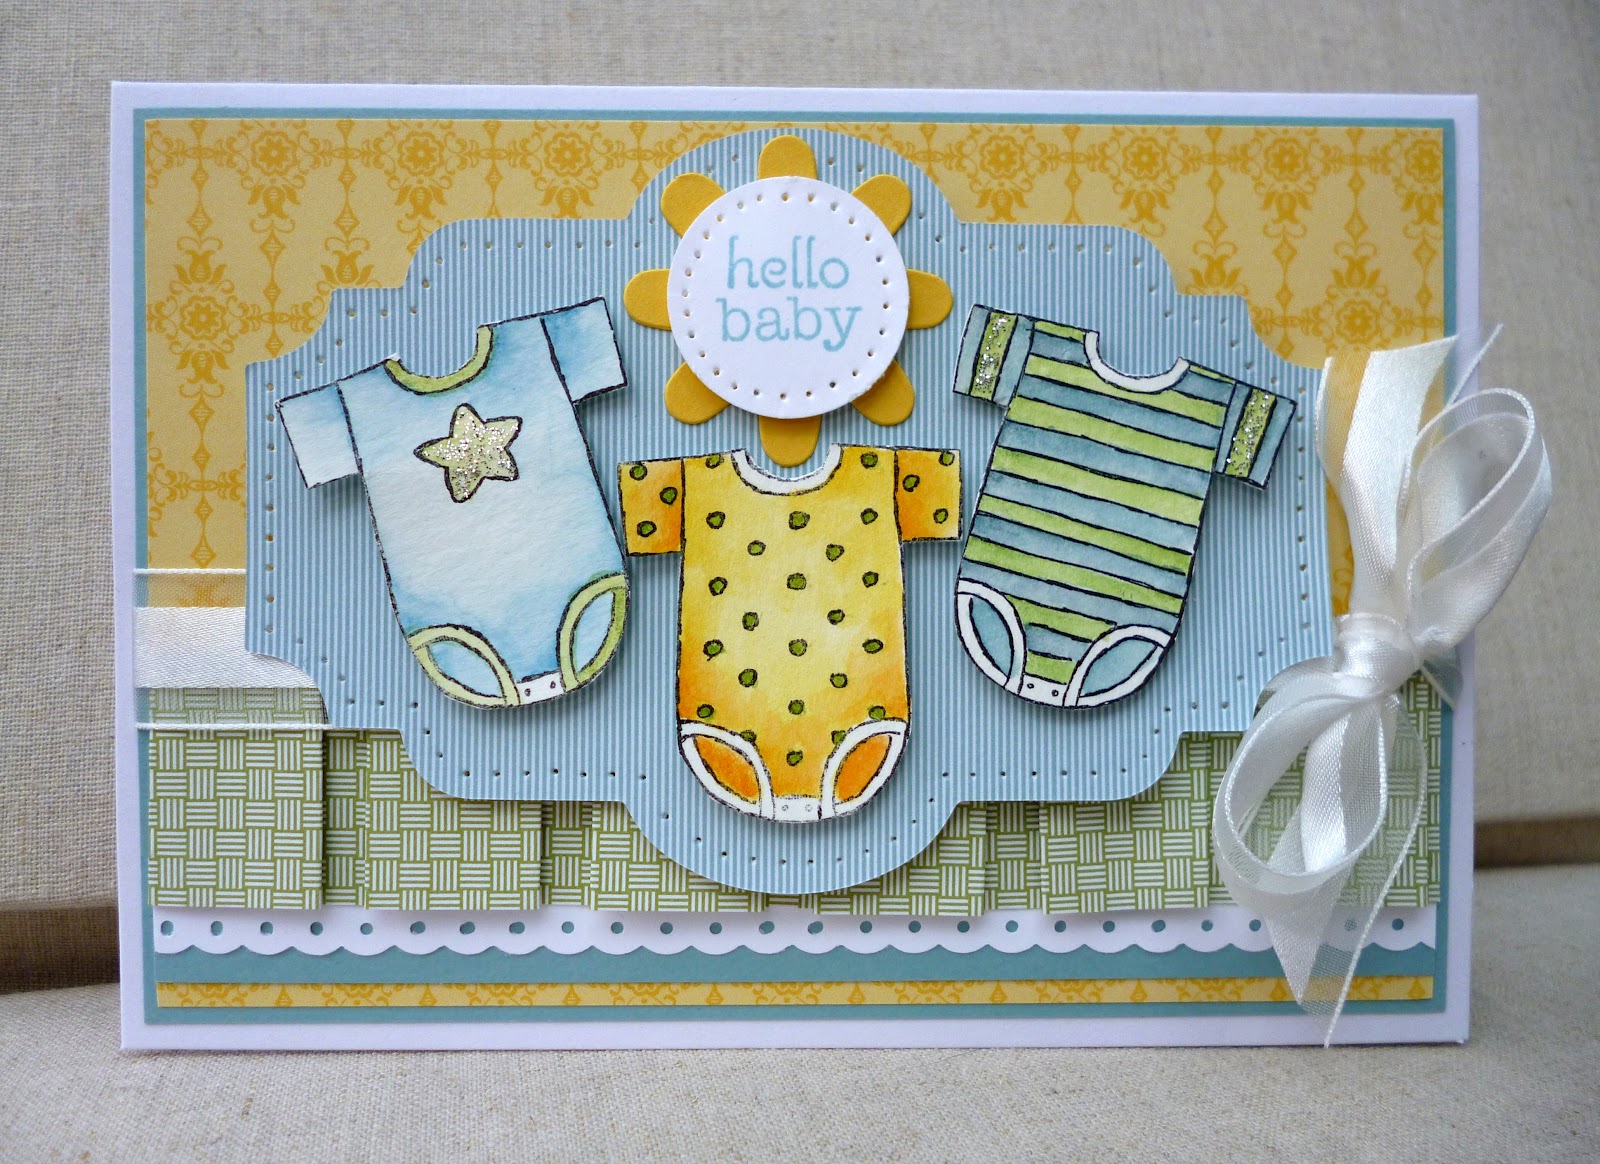
I must say, I really love how this one turned out! I used one of the tags from the Snow Festival printed tags from the Autumn/Winter catty (starting tomorrow in the UK!!). I pierced around the edge and layered the baby grows (from the Baby Tees wheel) over the top (these were rolled with Stazon on watercolour paper and watercoloured - I added some silver dazzling details to the star and sleeves of the blue/green ones for a bit of baby bling). The sentiment was created using two stamps from Pennant Parade stamped in Baja Breeze and punched with a 1" circle punch. I pierced around the circle and layered it on a flower from the Blossom Party die.

The paper pleated panel is a piece of Twitterpated dsp scored and folded using the box-pleat method (see my tutorial for more details on how to do this). I layered this strip on a piece of Baja Breeze card with a strip of white punched with the dotted scalloped ribbon border punch peeking out underneath. The dsp in the background is Daffodil Delight patterns. I added some white organza ribbon (I have a ribbon addiction it seems!) to finish.

Make sure you pop over to the Friday Mashup and check out what the rest of the Design Team have created...

Thanks for stopping by!

x Amy x

Thursday 30 August 2012

Gingerbread Latte anyone..?

Hiya,

I'm still having fun playing with my new goodies - at the moment it's just one new stamp set (Scentsational Season) and a bunch of papers and accessories but come Saturday morning I'll be placing an order for a truck-load of new stuff lol!! Getting very excited about that lot arriving..!! Anyway, onto today's card - I combined the Dynamic Duos colours with this week's Retro Sketch...


At first these colours don't say 'Christmas' but I thought I'd give a non-traditional Christmas card a try...


I replaced Concord Crush with Elegant Eggplant as I wanted to have this card on my inspiration board for the new catty and Concord Crush will be retiring next month. The background was created by stampng a flower from Mixed Bunch repeatedly on Wisteria Wonder card using Frost White shimmer paint. The mugs (from Scentsational Season) were stamped with the two purples and die-cut with the coordinating dies. I also stamped and die-cut the steam and a gingerbread man (using Crumb Cake ink) to fit in the mugs. I added some sparkle to the mugs using the new silver Dazzling Details - love this stuff!!  These were layered on a top note die-cut that I trimmed to fit the sketch design. The sentiment is from Curly Cute. Finishing touches include some  white taffeta ribbon, an Elegant Eggplant button, a few rhinestones for the gingerbread 'buttons' and some faux stitching using a marker.

Thanks for stopping by!

x Amy x

Sunday 26 August 2012

Paper Players + New Goodies!!

Hiya!

We've got a great sketch to play with courtesy of LeAnne this week over at the Paper Players...


I decided to have a play with some of my new goodies from the up-coming Autumn/Winter catalogue...


I rotated the sketch and used a piece of Snow Festival dsp as the focal point. I layered a tree stamped in Gumball Green and die-cut with its matching die over the paper and added some silver Dazzling Details for some sparkly dots. I tied a piece of Indigo Island bakers twine around the trunk as a finishing touch. The little owl was cut from another piece of the Snow Festival dsp. The die-cuts at the sides of the image are a framelits shape cut in half - I added some faux stitching with a Primrose Petals marker. The background is Baja Breeze card with more Snow Festival.

Check out what the rest of the design team have created with this fabulous sketch:

The Paper Players Design Team


Thanks for stopping by!

x Amy x

Saturday 25 August 2012

Gingerbread time!

Hello!

I've been having fun with my new goodies from the Autumn/Winter catalogue coming in September (I'll have another card to share tomorrow for the Paper Players). I used this fun sketch from Just Add Ink:


I used some new papers (from Festival of Prints) as well as the Scentsational Season stamp set and coordinating dies for this card...


I went with a rustic feel for this one, using Cherry Cobbler, Crumb Cake, Very Vanilla and Festival of Prints dsp. The gingerbread man was stamped with Soft Suede on Very Vanilla and cut out with the matching die (hee!!) and added some old olive brads to his middle, then layered on an embossed frame cut from Cherry Cobbler and Crumb Cake. I added some new cotton ribbon and a brushed bronze button (LOVE these!!).

That's all for now... thanks for stopping by!

x Amy x

Friday 24 August 2012

Mashup Aviary Thanks...

Hi there,

There's a fun colour challenge this week at the Friday Mashup:

 
So here is the "Mashup" Challenge:
  1. Make a project with the colors "Midnight Muse, So Saffron, Tempting Turquoise & Soft Suede".
  2. Or Make a "Thank You" project .
  3. Or "Mash it Up" and create a "Thank You project w/ the colors Midnight Muse, So Saffron, Tempting Turquoise & Soft Suede".
 
I decided to pair the colours with the sketch from Pals Paper Arts:


As demonstrators we were able to pre-order some things from the up-coming Autumn/Winter catalogue as well as the NEW in-colours - hooray!! I was hoping mine would arrive in time for this colour challenge so I could use Midnight Muse... and my box of goodies arrived on Monday - woohoo! I used the Aviary set to create my focal panel...


I stamped the Midnight Muse background with some of the images from the Aviary set. The So Saffron panel is a mix of cardstock embossed with the dotty embossing folder and some So Saffron dsp layered on Whisper White. The central panel is a shape cut with the labels framelits dies, stamped with the birdcage stand in Soft Suede. I stamped each birdcage with Soft Suede and the owl and bird inside then trimmed with my paper snips and popped up with dimensionals. The sentiment is from Teeny Tiny Wishes, punched out with the Word Window punch. The ribbon is whisper white taffeta spritzed with So Saffron ink mixed with water.

Make sure you pop over to the Friday Mashup to check out what the rest of the DT have created.

Thanks for stopping by!

x Amy x

Wednesday 22 August 2012

Basic River Sympathy...

Hello,

Just popping in quickly with a card I made using the Dynamic Duos colour combo and this week's Retro Sketch...

I was asked for a couple of sympathy cards last week and realised that I don't have many in my collection so made a note that I nsed to make a few more. They're not cards I think about making until I need them but then sometimes I don't have time so it's always good to have a few on hand. I thought these colours would work well with the silhouette image from Just Believe so I started with that...


I stamped the image on Very Vanilla and embossed with black EP then sponged River Rock ink over the lower portion. The layers in the background are a combination of First Edition dsp, Basic Black dsp and River Rock cardstock stamped with the swirl from Everything Eleanor using River Rock ink. The ribbon is Very Vanilla seam binding that I dyed with River Rock reinker & water then dried with a heat gun. I added an antique brad to the double bow and some black brads in the top corner. The sentiment is from Teeny Tiny Wishes.

That's all for now... hope you're having a great week wherever you are!

x Amy x

Sunday 19 August 2012

Paper pieced wheels...

Hiya,

This week's fun challenge over at the Paper Players involves a fun technique...


It's CAS week and Anne Marie is challenging us to use the paper piecing technique (that is when you stamp an image on dsp and encorporate all or part of that into your design). This is a really fun technique (particularly if you like fussy cutting lol!) - for me the challenge lay in the CAS part...! I've said this before, and anyone who knows the sorts of cards I like to make will have noticed this, but I struggle with CAS big time! When I try a CAS design I look at it and think that it's missing something... So I went with a boy's card - I figured that this might lend itself to a simpler design!


I picked the colour combo from the Colour Coach - Tangerine Tango, River Rock and Not Quite Navy and used this week's Freshly Made Sketch for the layout...


The car from Need for Speed was stamped on Tangerine Tango patterned paper and cut out (minus the wheels) and layered on the same image stamped on Whisper White cardstock. I then stamped the image again on River Rock dsp (from Well Worn) and I cut out the windows and headlights from there and layered over the top. I added a layer of dots with a NQN marker above and below the car on the white panel. The dsp on the left of the card is also from Well Worn, and I added some retired River Rock buttons tied with baker's twine to embellish.

The rest of the design team have some fabulous samples to inspire you using this technique:

The Paper Players Design Team

Thanks for stopping by!

x Amy x

Friday 17 August 2012

Bright Bloom Mashup...

Hiya,

We've got a fun challenge this week over at the Friday Mashup - this week Amanda has come up with a sketch with loads of possibilities...


So here is the "Mashup" Challenge:
  1. Make a project with "the Sketch".
  2. Or Make a project w/ a "flower or multiple flowers".
  3. Or "Mash it Up" and create a project w/ "the Sketch and a flower or multiple flowers".

I used the Mixed Bunch stamp set to come up with this...


I created the background using white ink to stamp the daisy flower then using masking and sponging created shading. The flower was created using the blossom punch and modern label punch, with a Tempting Turqouise button in the centre.

I chose the colours based on this week's Colour Q challenge...


Make sure you head over to the Friday Mashup to check out what the rest of the DT have created.

Another update on the sweet little kitty that found us a couple of weeks ago: the neighbors asked us yesterday if we could take her off their hands... they didn't want her anymore! (I don't understand that at all cos she seriously is the sweetest little thing!!). After about two minutes of discusion with hubby we said yes... so she's now making herself comfortable in her new home:


Bless!!

Thanks for stopping by...

x Amy x

Sunday 12 August 2012

Nautical Birthday...

Hi there!

If you're looking for my Sweet Sunday Sketch post, scroll down or click here.

This week at the Paper Players Ann has a fabulous colour challenge for us:


When I saw these colours I immediately thought of a masculine theme so I took out the Open Sea set and some Well Worn dsp...


I stamped the ship on Very Vanilla using Not Quite Navy then cut out with one of the framelits dies and while the paper was still in the die I lightly sponged Crumb Cake ink around the edge to give a bit of shading. The Crumb Cake panel underneath was stamped with the ledger image from Open Sea with Crumb Cake ink and I added a few strips of dsp (First Edition and Cherry Cobbler prints) and the sentiment from For MyvFamily. Two Cherry Cobbler buttons and an antique brad finished things off. I used the layout from Freshly Made Sketches this week:


Check out what the rest of the Design Team have created with these colours:

The Paper Players Design Team

Thanks for stopping by!

x Amy x

Saturday 11 August 2012

Sweet Sunday Sketch - Guest Stamper!

Hello!

I have exciting news: I get to play along with this week's Sweet Sunday Sketch as a Guest Stamper... woohoo!


I love Karen's sketches so when I found out that I'd been chosen to be a guest designer I was thrilled! This week's sketch was a fun one with lots of possibilities:


I decided to use a stamp set that should {hopefully!} be in our UK catty come October called Elements of Style...


The floral image was embossed with black on watercolour paper and coloured with markers and an aqua brush. The dsp is a mix of Not Quite Navy prints and Paisley Petals. The sentiment is from Apothecary Art, stamped with Not Quite Navy on Daffodil Delight and turned into a banner using a square punch to shape the end. I created a ruffled ribbon effect using some white organza ribbon and sticky strip then finished it off with a matching bow with an antique brad in the middle. I couldn't resist adding a little butterfly as a final touch!

I used the colour palette from this week's Colour Q challenge but had to make some substitutions because we don't have the new in colours yet (not long now!!).


You can check out what Karen and the rest of the DT have created here.

Thanks so much for stopping by!

x Amy x

Friday 10 August 2012

Black & White Bling...

Hiya!

It's time for another fun Friday Mashup challenge and this week Tara is challenging us with a rather sophisticated theme...

So here is the "Mashup" Challenge:
  1. Make a project using " Black N' White Only ."
  2. Or Make a project with " Some Bling ".
  3. Or "Mash it Up" and create a " Black N' White Project with some Bling! "

I knew I wanted to make a wedding card using the Love & Laughter set from the Summer mini catty so I combined that with the Notably Ornate frame...


Good thing I like my paper snips eh?? Yes that frame was a bit of a faff to cut out but I love the effect. The cake was stamped with Stazon on some retired wedding dsp (Bride) then trimmed with my paper snips. I added some thin black card with some rhinsetone strips to decorate the cake. The black layer is also some of that retired wedding dsp (Groom). The white background was embossed with one of the Adorning Accents embossing folders in a strip then I added score lines above and below using the Simply Scored tool. I added a sentiment banner to finish.

Make sure you stop by the Friday Mashup and check out what the rest of the DT have created.

Thanks for stopping by!

x Amy x

Wednesday 8 August 2012

Wasabi Notebook...

Hello!

I played around with the Dynamic Duos colour combo and the Stamping 411 sketch last night...


I wanted to make a covered notebook (love making these!) as I still have some of my 10p notebooks I picked up at a bargain store. I used black and vanilla as my neutral colours and ended up loving what I came up with!!


I made a cover for the notebook with Basic Black card, rounding the corners and lining the inside with some First Edition dsp. The Wild Wasabi piece layered on the front was stamped with one of the flowers from Mixed Bunch then sponged with Wild Wasabi ink around the edges. The strip of dsp is from Holly Berry Bouquet (Wild Wasabi with a vanilla print). The focal piece from Apothecary Art was stamped with Stazon on Confetti Cream and coloured with an aqua painter and inkpads. I trimmed this label with my paper snips and layered it on a die-cut black label. The 'notes' letters were cut from black card using the Timeless Type alphabet dies, adhered to the label then covered with Crystal Effects to make them really pop. I couldn't resist adding some Pumpkin Pie butterflies, with some brads in their centre (the largest buttefly has a filigree brad with an antique brad through the middle). I finished things off with some faux stitching with my black marker.

Here's a shot showing the notebook in the middle:


Thanis for stopping by!

x Amy x

Sunday 5 August 2012

Back to school balloons...

Hiya!

This week at the Paper Players it's a theme challenge...


I ran a class using Up, Up and Away on Friday night and one of the cards fit nicely with this challenge...


I don't have children that are going back to school but a friend who was in my class at Bible School for the last two years is going off to University next month so I thought this would be good for her. I created the hills using the adorning accents edgelits die and embossed both parts with the square lattice embossing folder. The sky was created by sponging Bashful Blue ink around a punched scalloped oval, moving the shape into different places until I achieved a cloudy sky effect. I also stamped the clouds from the stamp set with Bashful Blue as well. The balloons were created using different techniques: one was stamped with Rich Razzleberry and coloured with a blender pen; another was inked with markers; and the other was rock and rolled with Daffodil Delight and Pumpkin Pie then 'kissed' onto a background stamp to give it texture. The sun was created using the scallop circle punch and then 1 3/8" circle punch, as well as a stamp from Circle Circus.

Check out what the rest of the Design Team have created for this challenge:

The Paper Players Design Team
 
Thanks for stopping by today!

x Amy x

Friday 3 August 2012

Vintage Mashup...

Hi there,

We've got a great challenge today over at the Friday Mashup - it's right up my street!

So here is the "Mashup" Challenge:
  1. Make a project with a "Stick Pin on it."
  2. Or Make a "Vintage" project.
  3. Or "Mash it Up" and create a "Vintage project with a Stick Pin on it."

I love the vintage look so I knew I was going to have fun with this one! I've been doing a bit of a declutter and clean up of the house and have spent most of the time in my craft space so far...! Part of my sorting included a whole bunch of images and die-cut that have been left over from other projects, or created and never used. I saw a couple of butterflies and a flower and thought I could layer them with a stick pin in the centre so that's where I started...


There are a few things I always get out when it comes to vintage: Crumb Cake card & ink and sponge daubers! I tend to use Very Vanilla rather than Whisper White as it looks 'older' when distressed. The butterfly I created was so bulky with the big flower in the middle that I decided to make a piece of wall art rather than a card (the butterfly wouldn't have fit into an envelope!!). I used a piece of chipboard that I bought in a pack of 6 (originally intended for an album, but separated make great bases for wall art). I used the layout from the Sweet Sunday Sketch to get me started:


Here's the recipe:
Stamps: Occasional Quotes (retired hostess set), Vintage Vogue, Delicate Doilies
Ink: Crumb Cake, Early Espresso, Soft Suede, Calypso Coral, Whisper White
Paper: First Edition dsp, Mocha Morning dsp, Beau Chateau dsp, Crumb Cake, Soft Suede, Early Espresso, Calypso Coral, Very Vanilla, Confetti Cream
Tools: Two tags die, Butterflies die, Circles #2 die, 1 3/4" circle punch, 2 3/8" Scallop circle punch, Blossom punch, Crop-a-dile
Accessories: Crumb Cake seam binding, lace trim, Stick pin and jewels (from retired Pretties kit), jumbo eyelets (retired).

Make sure you pop over to the Friday Mashup and check out the other gals' gorgeous projects!

By the way - for those who wanted an update on the little kitty that befriended us last week - she ended up belonging to a neighbor (one who I hadn't asked!) so she's back home but at least we can have regular updates on how's she's doing! It's funny, cos we already have four cats and I've told Richard that we cannot have any more... yet after this little one spent a few hours with me I could have happily adopted her - she was adorable!!


Thanks for stopping by!

x Amy x

Thursday 2 August 2012

Fresh Manly Duo....

Hiya,

Just popping in with a quick card I made combining a few challenges...

I thought the colours would suit a masculine card so I got out my Up, Up and Away set and work with that...


The balloons were stamped on First Addition dsp, first with Early Espresso then with Crumb Cake. I used the top note die to cut the shape and the Early Espresso layer underneath. The dsp strip is from Well Worn and the border at the side was created using the scallop edgelit die - I cut it once then moved it along sligtly and cut again - makes for a bit of a different border!

That's all for now - I'll be back tomorrow with my Friday Mashup creation...

Thanks for stopping by!

x Amy x